The blog and resources library of a primary school teacher in Scotland
  Monday Morning Teacher
  • My Blog
  • Follow Me!
  • About Me
  • Books
  • Resources
    • Numeracy
    • Literacy >
      • Alphabet
    • End of Year

2 Times Table Coloring Pages and a Digital Activity...

21/7/2020

42 Comments

 
Picture
I don't know about you, but the move to digital learning over night in March made me realise how much I needed to update my Google Drive knowledge and skills. Having taught mostly younger children, I had never really gotten to grips with how Google Drive works, how to create work for Google Drive, and how to assign activities to children digitally. 

So, like many of you, I'm sure, this is something I've been working on.

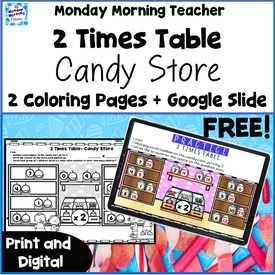
 I've had more time to spend with Google Drive since the start of the summer, and I've made a few multiplication resources to try to develop and strengthen my digital knowledge and skills. I know schools are planning for different schedules when they go back this year (full time in class / full time digital / a mixture of both), so the 2 times table (free) resource I'm linking to here has both a digital and a printable component. 

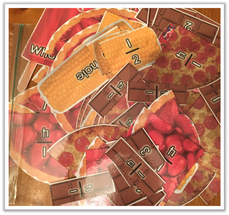
This file has 2 versions of a 'Candy Store' 2 times table picture (click the 'Candy Store' picture above to access the Google Slides folder that contains all of the files). Children multiply each number on a candy jar by 2, writing the answer in the candy jar next to each number. Once they are finished, they can then color the picture. Hopefully, the addition of the coloring job helps solve the 'What can I do now?' problem for your fast finishers!

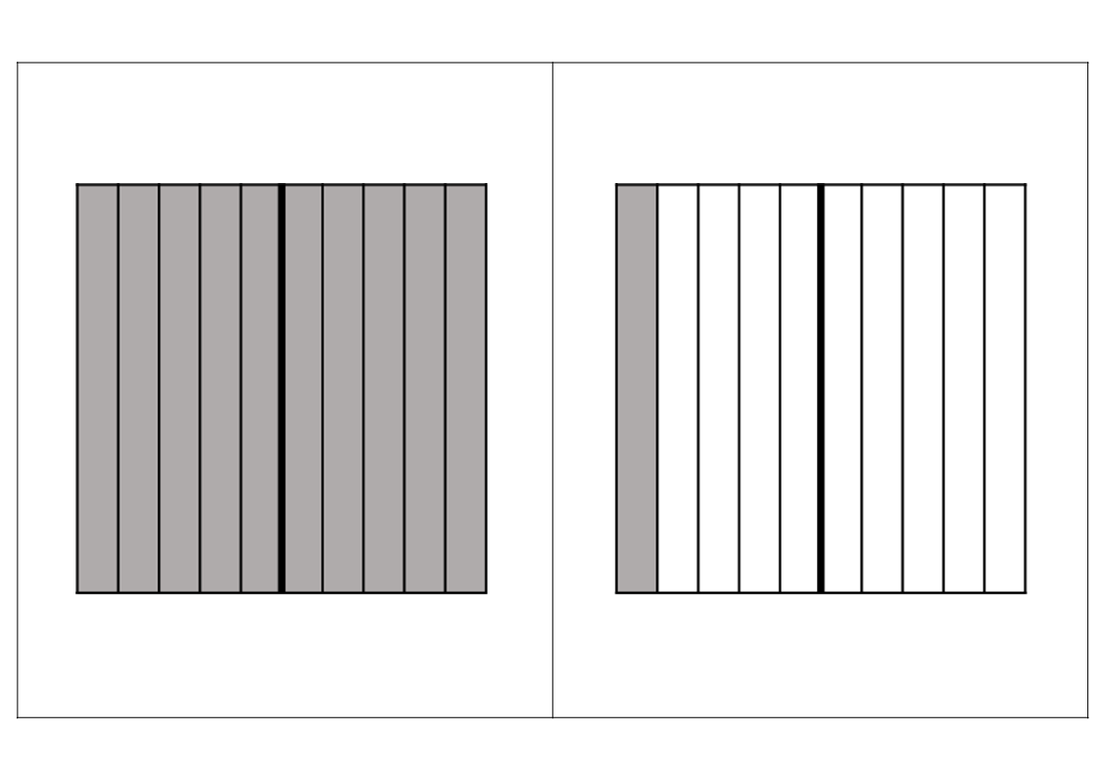
When teaching multiplication, however, I always want the children to be able to reference a visual representation of a multiplication equation. So the coloring page also asks them to find 'How many groups of 2 children' and create a multiplication equation based on that question.

On one of the coloring pages, there are no children - so their equation should be: 0 x 2 = 0. 

One the second coloring page, there are 2 groups of 2 children, so their equation should be: 2 x 2 = 4. 
Picture
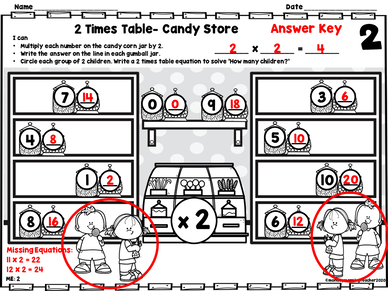
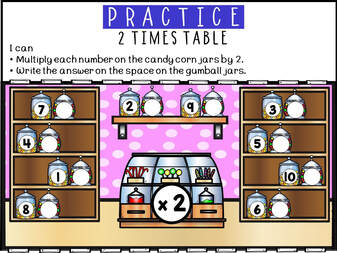
And the digital compenent: a full-color Candy Store, where children solve the 2 times table equations, writing their answers in the empty spaces next to each number (on the Google Slide, I have included a grey text box, so children just need to click the text box, and enter their answers). 

The digital version is the same as the coloring page versions, so the same answer key should be used for both. 
Picture
I hope you find these helpful! Any problems or questions, please let me know, so I can help resolve them (this will also help me to learn). 

Thinking of all teachers as we prepare to go back to the classrooms. Stay safe everyone. 
42 Comments

Subitizing with Dice Games - What Could be Easier?

5/10/2019

2 Comments

 
Picture
Subitizing is such an important early number skill. When Early Years teachers begin Number Talks, they often begin with dot cards that encourage children to see patterns in groups of dots (rather than having to count each dot individually). The Early Years Number Talk Starter Pack that I first shared about this time last year has FREE dot cards to get you started (click the dot cards to download this 60 page resource if you haven't already).
I was demonstrating Number Talks in some early years classes recently, however, and I quickly realised that while my dinosaur egg subitizing cards were a hit, the fact that they had 6/7/8 dots on them meant that they were too difficult for the classes I was working with. Chatting with the teachers afterwards, I recommended dice games. Rolling dice and beginning to recognise the familiar dot patterns on them is an excellent way to encourage subitising for all children - but especially when children are just beginning to learn to subitize. 
Picture
Picture
If your class needs practice with early subitising skills, click the link above left for a FREE sample with 2 dice games, as well as a fun Number Recognition listening activity. Like most of the math resource I've been making this year, these are all dinosaur themed (who doesn't love a dinosaur?).

The first dice game in this resource has children roll a single die and trace the correct numeral. Easy, fun counting - but eventually subitising - practice. The second game has children practice adding one to the number they've rolled. Children may well start by counting the dots each roll, but they'll soon progress to recognising the dot patterns and the associated number. 

The listening activity that is also included is always a favourite, and it lets you target both number recognition and listening skills. You call out a number and a color (instructions are given, although you can always make up your own), and  the children have to trace (or colour) that number using the color you've specified. 

If you like these free sample games and the listening activity, the complete (60+ page)resource is available by clicking on the first picture on the left below:
Picture
Picture
Picture
Picture
2 Comments

Dinosaur Playdough Mats - FREE!

14/9/2019

0 Comments

 
Picture
A class full of boys definitely needs dinosaurs! My class is boy-heavy this year, so for working on early number skills, I made a set of 1-10 Dinosaur-themed playdough mats. 

The mats have the focus numeral, a 10 frame (for putting the right number of playdough 'dinosaur eggs' in) and a picture showing that number of dinosaurs or dinosaur eggs. I've also put the name of the objects on the playdough mat because....multi-task learning is always a 
good thing (even if all they are picking up on at this stage is initial sounds). 

Each number has a red dot to support correct numeral formation. I always teach my classes to roll out playdough 'snakes' to make each number. The red dot is where the end of the 'snake' should be placed before they start shaping the 'snake' into the correct number. Have them begin as you mean them to go on!

There are 2 red dots on the number '4', to remind the children that they will need 2 playdough 'snakes' to make this number (just like they'll need to lift their pencil to finish making a '4' when they start to write their numbers). 

There are 2 different versions of the '1' and '10' mats - one gets children to just make a straight line down, while the other gets them to make the short 'up' mark before completing the '1' with a straight line down. I always teach the straight line down, but I know that different schools (and teachers) do things differently, so the 2 options are both included. 
​
Click on the picture above to get these mats for your own class. Hope your kiddos love them and they make your teaching life a bit easier. 

​I also hope your school year has started well! 
0 Comments

Numbers to 10 with Dinosaurs!

1/9/2019

0 Comments

 
Picture
My Early Years classes have always loved dinosaurs, and this year is no exception. So Numbers to 10 with Dinosaurs has been updated and is ready to go! 

As always, when children are working with numbers, they need both concrete practice (with manipulatives) and representational (picture) practice - and both should be linked to the abstract (the numeral itself). 

I love Dot Cards in the Early Years - they are such a powerful way to build number sense in young children (see any of my Number Talk posts - and go here if you want a FREE set of dot cards for your own class). I also wanted my classes to have practice with Numbers to 10 at a concrete level - how to do both? 

Well - you can have your class make their own Dot Cards for each number, cutting out and coloring Dinosaur Eggs to fill 10 frames in different ways. The act of cutting out and moving the eggs makes this activity concrete, rather than purely representational - something we should always be looking to do where possible. As an added bonus, classes get some fine motor practice as well! 

Picture
My T-Rex Numbers to 10 booklet (picture at the top) has always been a great 'fast finisher' job. There are 2 pages for each number, and it works really well printed as a booklet. Detailed instructions are given in the file if you want smaller booklets, with only 1 of the 2 pages (so you don't have to think about which pages to print yourself!). 
Picture
Picture
Every early years classroom I've taught in has had children who needed different levels of support and challenge. And that can be tricky! Over the years, I've made a variety of different Numbers to 10 Dinosaur-themed printables that let children practice different skills, depending on where they are in their own development. This file has 10 different printables, which target a variety of skills and knowledge, including number recognition, number matching, number amounts, early addition and early pre-subtraction skills. And including a dinosaur or a dinosaur egg on a printable never hurts! 

I hope the start of your school year is going well! If you are interested in this Dinosaur Number to 10 pack, click on any of the pictures...

And if you haven't already started to Count the School Days, it isn't too late to begin! You can get everything you need in this (FREE!) pack. 
0 Comments

All Things Alphabet (but particularly Vowels and Consonants!)

17/8/2019

0 Comments

 
Picture
I'm in Primary 1 (Kindergarten) this year, so the beginning of the year will be filled with all things Alphabet!

I've spent the last couple of days updating and extending the alphabet flashcards I used with my class last year. These flashcards coordinate with the Alphabet (Jolly Phonics) posters I wrote about earlier in the week.

There are at least 12 different words for most sounds (a few of the more unusual sounds have fewer than that). When I introduce a new letter, I add these flashcards with words and pictures to our word wall underneath the correct poster. 

Having so many different words for each initial sound reinforces both the letter sound itself and children's ability to focus on initial sounds. The flashcards also become a useful resource for the children as they learn their initial letter sounds, practice early writing skills, and eventually begin to write simple sentences. 

But - what needed to be changed if I already had the flashcards last year? Well, I've added some additional words, but the most important change I made was border colour. 

Originally, I made the letters in a variety of different colours (yellow, blue, green pink, purple, red, etc), alternating as I went along. It made for a lovely, colourful display. 

But as great as the colours were, I realised I was missing a teaching trick by not using the border colours to help children differentiate between vowels and consonants. So the vowels are now bordered in red, while the consonants are in blue. This visual cue helps children (when you highlight it for them, over and over again!) to recognise quickly the very important difference between vowels and consonants. 

With the most obvious exception of 'c' and 'g' (which make both hard and soft sounds - although the changes in these consonants are controlled by vowels!) and also 'y' (which sometimes functions as a vowel), 'a, e, i, o, u' are the trickiest letters in the alphabet, as well as being the most powerful.

In order to read, children need to know both vowel sounds and vowel names. Many of the phonemes (2 letters to make one sound) we use have at least 1 vowel in them. And if children sound out a word and it still doesn't make sense...it's almost certain that one of the vowels is playing up and making a slightly different sound than expected (generally speaking, consonants are much better behaved!). 

As a teacher - and particularly a Kindergarten teacher - there is so much that you need to help your class learn. So any simple visual tricks to remind children of important literacy rules are invaluable. I'm looking forward to using these new colour-coded posters and flashcards this coming year. If you'd like to use them as well, you can find them by clicking on either the picture above or one of the two pictures below (these show some of the resources you'll find in the file - there's a whole other preview page, which you can see if you click on the link that takes you to TPT).

These flashcards also come with 4 different printables (and the printables also come in different versions that save photocopying, once children have learned how to do each flashcard task!). The printables transform these flashcards into a resource that can easily be used in literacy centers, stations, etc. throughout the week. 
Picture
Picture
The flashcards for the entire Alphabet plus the 4 printables total more than 110 pages, but I've put together flashcards for the letters A and S in a separate, FREE file, that you can find by clicking either one of the picture below. These FREE flashcards also come with a simple printable that your class can use with them during literacy centers, etc. 
Picture
Picture
0 Comments

Count the Days in School - You Won't Regret It!

16/8/2019

0 Comments

 
Picture
Many teachers are already back to school, with the rest of us soon to follow. I'm re-posting this updated (free) 'Count the Days in School' pack. If there is only one new math routine you add into your K-2 school day, this should definitely be it. 

Why? Let me count the ways! 
​
- It only takes 1-2 minutes each morning. Very quick, very easy, very effective!
- Children love it (you must find a way to keep track of who has already had a turn to add the sticker to a 10 frame or you will have arguments on your hands).
- It provides a visual representation that children are directed to each morning of both number amounts (how big a number is) and place value information (tens/units, but also hundreds if you continue to count past 100 days, which I highly recommend). 
- It provides an easy way into early years Number Talks, while also providing that important visual representation that helps kids to really 'get' numbers, how they are constructed and how they can be partitioned. 

I've updated this pack to make it slightly easier to print and cut out. I've also included 3 pages of Number Talk ideas for the 3 different stages (K-2 / P1-3 / Reception-Year 2).

The main title for this display is 'We are counting the days in school'. In this pack, however, I've also included 4 additional titles that allow you to count: 
1) Days in the School Week
2) Days until Christmas
3) Days until Spring Break
4) Days until Summer

I know that there are some settings where counting smaller amounts (or more repetition of early counting skills) is important, so hopefully these additional sign options will help more people incorporate this routine into their classes in a way that is meaningful for their own pupils.

Welcome Back to School!

0 Comments

Back to School in Primary 1 - Alphabet Time!

8/8/2019

0 Comments

 
I know it's hard to believe (and accept?!), but it's almost Back to School time here in Aberdeen. I know some teachers are already back, others go back next week, while others still have a bit longer...but it's coming for all of us!

This coming school year, I'm back in Primary 1 (Kindergarten). I'm really looking forward to it! I'm in a new school which uses Jolly Phonics, which is new to me. 

​So.….
Picture
I've spent the last few days updating some of my alphabet resources, so they will fit in with the Jolly Phonics programme. I've just finished my Alphabet display posters, which you can find (FREE!) on TPT by clicking on the picture above. 

Wherever possible (which means for 22 of the 26 letters), I've linked the image to the Jolly Phonics song that introduces that letter. There were a few letters that just didn't work ('G' for 'gurgling' and 'N' for 'nnnnn'....an airplane sound, come immediately to mind), so I've tried to choose simple, easily recognisable words/items to go with those letters instead. 

All of the consonants have blue borders, while the vowels have red borders. This visual cue helps children differentiate between vowels and consonants right from the start. This is important, as vowels make both their short sound and 'letter name' sound (unlike consonants) - as well as (let's be honest) making other vowel sounds AND also remaining silent. 

Vowels are tricky! 

By highlighting the vowels and how carefully you need to keep an eye on them, you can set kids up for success in literacy. If they sound out a word, but don't recognise it, it's almost always the vowel that is doing something unexpected. If kids know this from the beginning, they'll have a head start when they begin to blend sounds and start reading. It also cuts down on a lot of confusion! 

If you're looking at the picture above carefully, you'll see that there are 26+ alphabet display posters. For a few of the letters, I've added a second 'alternative' poster. These are generally letters where the Jolly Phonics picture is great - if you are using the Jolly Phonics song. But if you are using a different programme, a different (easier) word might be better. So if you need alphabet posters, but aren't using Jolly Phonics - these posters will still hopefully be just what you need! 

I'm generally in an 'updating resources' mode at the moment, so please do check back, as I'll be posting up all the different alphabet resources I've made and used with my littlest classes. 

Have a great new school year everyone! 

​
0 Comments

Christmas Playdough and Messy Play

16/12/2018

0 Comments

 
Only one more week to go - not that we're counting down! 

Over the weekend, I've made a few Christmas themed playdough/activity mats suitable for early years (nursery/P1/P2 or so). They are simple for the children to do on their own, so could be an extra activity put out during choosing time or soft starts/finishes. They could also be used with an adult for more directed messy play.
Picture
Picture
Picture
Picture
Picture
You can see a sampling of the activity mats that are included in the file above (I know I don't always want to have to download the whole file to decide whether or not I think it will be useful!) Most of the mats include the main 'Christmas word' in bubble writing, so the child can be encouraged to roll out playdough 'snakes' to shape into the letters of each word.

There is also a template sheet (above) for building an igloo out of sugar cubes. Any colouring should be completed first, then children can be helped to put glue along the base outline for the igloo. The next layer will require another layer of glue along the top of the sugar cubes already put down, etc. This is probably a 2 day project, as after 2-3 layers of sugar cubes, I suspect you'll probably want to leave the igloos to dry before continuing. 

​I know the last week of school can be hectic, so I thought there might be a few teachers who would appreciate these activities as a fun way to celebrate the Christmas season, fill some time educationally and enjoy messy play (because what child in the early years doesn't like messy play?!). To download the file, click on the 'Christmas Early Years Activity Mats' picture at the top of this blog post. 

0 Comments

Easy Christmas Tree 'Ornaments' to decorate a Class Christmas Tree

10/12/2018

0 Comments

 
Picture
I wanted to have a classroom tree this year, but was a bit worried that if I took in ornaments from home, they might get broken...

And ornaments from a teacher's home aren't very personal anyway, so I decided to let my class make their own ornaments to decorate the class tree. 

These 'ornaments' (I use the term loosely!) are very easy to make, as you can see from the picture to the left. The children just colour the picture (they can also colour the frame and either colour or trace the word), you punch a hole in the top, thread a bit of ribbon through the hole, laminate, and hang on your class

tree. Laminating isn't necessary, of course, but it improves durability - and if you put the child's name and the month/year on the back, it also makes these little 'ornaments' into a nice keepsake for parents at the end of term. 

In the file, I've included colour versions of the different ornaments. I used these as my 'look what I prepared earlier' version (a bit of a cheat, but we are always so short on time...).

​At the end of the file, there are a couple of different versions of Christmas colouring/writing sheets (suitable for pre-K/K, probably). If you think you could use these in your own class, just click on the picture above. 

​
0 Comments

Rights Respecting Schools - Creating a Class Charter

26/8/2017

1 Comment

 
Picture
 Welcome back to the new school year! This blog has been quiet, as I spent last year getting my head around teaching Primary 5 (it was my first year teaching outside the Infant Department). I'm teaching P4/5 this year, so hopefully I'll have more time to share what is working well and not so well in my class.

​Like many of you, we are back to school here in Scotland. And one of the early
school year tasks each class has is to create a Class Charter as part of our Rights Respecting School Status. These Class Charters are each based on 3-4 rights chosen from the UN Convention on the Rights of the Child. 

​I've done this in different ways in the past, and the Rights Respecting Schools website has some great ideas and resources available. This year, I've put almost all of the different Rights onto individual cards. There are 45 Rights in the Convention - I've made cards for 39 of them. The cards have put the rights into child friendly language as much as possible. 

At the end of this blog post, you can see a screenshot of one of the pages of cards I've made, and at the end of the post, there is a link which will take you to the file, if you'd like to use them yourself.

​I have 6 tables in my class, so I think I'll give each table 5 different cards (weeding out 9 of the cards that aren't relevant to school...probably the ones giving governments' responsibilities, etc). I'll ask each group to eliminate any cards they think aren't relevant to school, and then rank the remaining cards in terms of which ones are most important in our classroom context. 

​Each group can then feedback to the class as a whole, and we'll work as a class to narrow down our class choices to 3-4 Rights that we want to focus on. 

​If anyone would like the individual cards in PDF format to use in your own class, you can click here. ​
Picture
1 Comment

Place Value Representations

28/10/2016

0 Comments

 
Picture
Like many teachers, I began our school year looking at place value concepts. Place value is so foundational to a child's understanding of maths that it always seems like the obvious place to start.

​Prior to this year, I've always taught in infants (K-2), so place value concepts focused mostly on 0-100, stretching to 1000 when I taught P3 (2nd grade/Year 2). I had a few children in P3 who were ready to go to 10,000, but for the most part, the class needed to focus on developing fluency with smaller numbers. To develop deep understanding of place value (like any maths concept), children need to follow the concrete - representational - abstract progression. So - cue getting out lots of cubes, counters, base 10 materials, etc during my infant years.

​But this year, I've moved to P5, so I needed to teach place value to 10,000 and 100,000 for some of my class. This is much more difficult to do at the concrete level - even having bought a class room set of Base 10 materials before I started teaching, I still only have 3 thousand cubes. And even if I hoard all the thousand cubes in the entire school (not that I even considered doing that!), I still could only model working with 10,000 for my class - I couldn't give each child a set of Base 10 materials that would allow them practise building these numbers themselves. What to do?

​As you can see from the above picture - I decided to make sets of Base 10 cards for my class. Granted, it's representational, rather than concrete - but that's still better than working only with the abstract concepts. I have made 12 sets of these cards (20 of each Base 10 value), so the children can use them with partners (I have 23 children in my class at the moment). I made an additional set for my magnetic white board by simply adding magnetic tape to the back of each card (several of the girls in my class take it on themselves to organise any cards I've used at the end of each maths lesson, so they stay relatively neat!).

Picture
I use these cards to give kids a visual representation of any 'number talk' equation I'm asking them to solve. This allows them to see that when you have 5 hundreds and you take away 3 hundreds, you have 2 hundreds left, etc. Having the visual available can help take some of the mystery out of working with larger numbers.

​Making the sets took a bit of time at the beginning of the year, but it's all easily guillotine-able, so it isn't as bad as it looks! And once the sets are made, you have them - so far, my sets seem to be holding up pretty well. Having 1 set between 2 children can seem like a lot, especially if you have a larger class. However, if you have your class work in groups, you could probably get away with making fewer sets.

​If you think these would be helpful in your own class, you can get the file by clicking on either picture.

0 Comments

Counting the Days of School with an Older Class

14/10/2016

0 Comments

 
Picture
Part of my morning routine for the past few years has been counting the days in school with my little ones. We've then borrowed the American '100 days of school' celebration idea and as an infant department, had a 'maths morning' in which we celebrated all things '100'.

​This blog post gives a good overview of how I used this routine with younger children. It is wonderful for building number sense. If you are interested, you can click on the '100 days of school templates' picture above and download everything you need to make this simple routine part of your school morning as well.

I'm teaching Primary 5 (equivalent of 4th grade in the States or Year 4 in England) this year, however, so if I wanted to keep this routine, I needed to vary it a bit so that it was a productive use of class time. I love the routine (and you always have kiddos who benefit from reinforcement of simple place value concepts, even in P5), so at the beginning of the year, I thought about how I could extend this idea to develop my class's mathematical thinking.

At the moment, there are 2 main ways I'm using my 'count the days' ten frames.
Picture
First, we are consolidating our ability to get to the next multiple of 100 quickly and accurately. We all know how important it is for children to know their number bonds to 10. But getting to the next multiple of 100 is an equally important skill - and children often find it tricky.

​In the 'Counting the Days' set up to the left, we need 98 more days to get to 100. When we left school last Friday to start our 2 week October break (which is one of the reasons I'm finally finding the time to add a blog post), we had counted 37 days in school, which means we need 63 more days to get to 100.

​This daily practice getting to the next 100 is important. While many in my class understand how to do this, we still have more-frequent-than-I-would-like mistakes where the 'tens' add up to 100 because we forget that the digits in the units place also add to 10, making the last group of 10 that we need. Seeing the dots laid out on the 10 frames gives the kids a visual reminder that we need 9 tens in the tens place, because our final group of 10 will come from adding the units together.​

We are also using our 'Count the Days' routine to start thinking about and visualising decimal numbers. Our maths slot is right before lunch most days - once we reach lunchtime, we have completed half of our school day. So when I remember (which isn't every day!), we add half a dot just before lunch to represent the half day we have completed. We then write the total number of school days as both a mixed AND  decimal number. So if we have been in school for 36 1/2 days, that is also 36.5 days (and we read that as 36 and 5 tenths days, rather than 36 point 5 days).

​When we looked at place value at the beginning of the year, we talked about the first decimal place to the right of the decimal point, and how that showed us how many 'tenths' of one thing we had. We've also discussed how, in order to talk about part of a school day as a decimal, we have to divide one day up into 10 equal parts - and at our lunch break, 5 of those equal parts have passed, and we have 5 parts left. This is an idea that I reinforce most days when we add our 1/2 day. Repetition within a context that makes sense is great for developing number sense!

To give the kids a visual representation of the idea of 'tenths' of one day, I've made up the following fractional cards (below), which I've cut out, laminated and put on a scrapbooking ring (click on the picture below to get your own set). There are squares representing each tenth. I've made these into A3 size cards, but you can size them up or down as needed, as the file is a Powerpoint document and editable.

​If you are also counting the days of school with your class and have different ways you use this routine to extend their mathematical understanding, I'd love to hear your ideas in the comments!
Picture
0 Comments

Top 8 Word Decoding Rules - Help Your Class Build Their Decoding Skills!

19/7/2016

5 Comments

 
Picture
When we go back to school (in 4 short weeks - eek!), I will move from P3 to P5 (from 2nd grade to 4th grade, if you are an American reader). That's a fairly large jump, and I am anticipating some challenges, as my experience is in the lower stages (P1-P3, or Kindergarten to 2nd), so it will be an adjustment. I'm just back from holiday, where I spent a fair amount of my 'relaxing' time reading up on teaching reading in the intermediate grades (on my Pinterest account, I've created a few new boards to help me organise some of the new ideas I've been gathering).

​But the process of thinking about how best to teach reading to older children has made me think about what I've learned as a teacher who has spent large amounts of time teaching children who are at the beginning of the reading process. While teaching reading comprehension skills are crucial right from the beginning, in the early stages, a large part of our job is helping children make sense of how to begin decoding words.

​So, as I say goodbye (for now, at least!) to my time teaching little ones, I thought I'd compile a list of the top eight word building/decoding rules. These are so important, because this knowledge that can help kids make sense of our confusing written language more easily. These are rules that I teach explicitly and that I repeat over and over and over again. And then I repeat it again, and then I get the children to repeat these rules back to me. Again and again. Repetition is key, so your kiddos internalise these rules, which then make decoding a much more logical process (although the English language always has exceptions to every rule!).  

​One thing I've found that helps kids as well is to personify the letters. I talk about 'bossy' letters and where letters like to be in words ('y', for example, often likes to be at the end of words, because it's used to being at the end of the alphabet). This little personification trick seems to help kids retain many of these rules quite easily.

Top 8 Rules to Help Kids Make Sense of Decoding Words
  1. The Basics: Kids need to know which letters are vowels (a, e, i, o, u and sometimes y), and they need to know both the long and short sound each vowel makes. When they sound out a word and it doesn't make sense, chances are it is the vowel sound they need to change.
  2. ​What letter usually makes the 'e' sound at the end of a word? Hint - it isn't 'e' (which is almost always silent)! It isn't always 'y', but it usually is...especially in the kinds of words little ones are most likely to come into contact with as beginning readers and writers.
  3. ​The vowels 'e, i, and y' are bossy when they follow the letters 'c' and 'g'. They make the 'c' say 's' (circus, centipede, bicycle) and the 'g' say 'j' (gym, giant, gem). Don't be afraid to introduce this idea to little ones - by the end of the year last year, most of my P1s could tell you this rule (and apply it in their reading, if not quite in their writing). If you repeat it over and over and over again, they will pick it up, I promise. And it helps them make sense of funny words, when they can see that these words do follow a predictable pattern.
  4. Controlled 'r' words. 'R' is also a bossy letter - it doesn't let 'e, i or u' say anything when it follows them (bird, letter, burp). AR is the pirate sound - so the r doesn't let 'a' say anything, but the AR combination makes the r say its name, rather than make its sound (car, tar, bar). And OR can go either way ('word' - can't hear the 'O', but 'corn' - you hear the long O sound). When first learning this rule, we start with the idea that R often doesn't let vowels say anything. It helps kids tremendously when they know that to read 'girl', they just skip over the 'i' sound, for example.​
  5. This next rule helps with spelling, more than reading: In a word, every syllable MUST have its own vowel. This rule helps kids make sense of words like 'letter' and 'butter', especially when combined with the idea of controlled R words. It also can help kids with words like 'little', 'castle' and 'bottle'. We need that silent 'e' at the end, so that the 2nd syllable has its own vowel.​
  6. The long 'A' sound at the end of a word is almost always made with the 'AY' phoneme (I can't think of any exceptions at the moment, but there usually are at least one or two!).
  7. ​'OI' and 'OY' - OY likes to be at the end of a word, because 'y' is at the end of the alphabet. OI, on the other hand, is usually found in the middle of words (never at the end). You have exceptions like 'oyster', 'royal' and 'loyal', but the rule holds true for most other words. I also tell kids that AY is at the end of the word because 'Y' likes to be at the end of things (since it's so close to the end of the alphabet).
  8. ​Teaching the verb endings 'ED' and 'ING' very early can help expand a child's ability to read tricky words enormously, with very little effort. When teaching 'ED', I talk a lot about the 3 different sounds ED can make ('T' - stopped, 'D' - played  and 'ED' - grounded). With little ones, knowing the 'ING' suffix can help them read (and write) really 'long' words and increase their confidence enormously.
​
​There will always be other rules, but these are the main ones I have used with my classes. Repeat, repeat, repeat. Then repeat again. Then ask them 'Why does the 'c' say 's' in this word?'. Ask over and over again. They will 'get it', I promise! These rules take the mystery and confusion out of much of the early decoding process. If we help kids see that, despite the fact that words initially seem very confusing, there are rules that can help us make sense of them, that is hugely empowering.

​Are there any other word  decoding rules you would add to this list? Let me know, if there are!
5 Comments

Fraction Fondue!

20/6/2016

0 Comments

 
Picture
To celebrate the Queen's 90 decades last week, our school had a 'Decades Challenge'. Each class was given it's own decade to learn about, and we then spent our week learning about different aspects of our given time frame.

​In P3, we got the 1970's - how fun! And since we were doing fractions in maths
anyway, I thought we just had to do 'chocolate fondue'.

Since we are P3, my class hadn't had much exposure to fractions (other than halving and quartering) before we started, so my 'learning intention' for this activity was to reinforce the meaning of the numerator and denominator. So we looked at how we 'name' fractions (this is the role of the denominator) and then how we count how many of that size piece we have (the numerator).

​For example, if we cut our banana up into 6 equal pieces, we name those pieces 'sixths'. If we cut our apple up into 4 equal pieces, we name those pieces 'fourths' (or 'quarters', which my kids have been told over and over is just a fancy name for 'fourths'). If our strawberry is cut up into 2 equal pieces, both pieces are called a 'half' (and that is the tricky one, since it means the denominator is two, even though half doesn't sound anything LIKE 'two'!).

​Then, once we know what to call each piece (based on how many pieces we cut one whole piece of fruit up into), we can count how many pieces we have - this is our numerator. So if our banana is cut into 6 pieces (sixths), and I take 3 of those pieces, I've taken three sixths of the banana (which is also one half, of course - a connection a few of my kids did manage to make).

​We had apples, bananas, strawberries and grapes to cut up. The kids at each table took turns cutting up their fruit. First, we cut up on the banana into 6 equal parts, and everyone got a chance to name ​the fraction. Each table had 2 bananas - so we 12 sixths. We did look at that fraction, and talked about the fact that the denominator is how many pieces we cut ONE thing up into (and we had 2 bananas, which is why we had more than 6 'sixths'). Some of my kids got this, although it was tricky for others. We also divided our 12 banana pieces out evenly, and that was more straightforward - everyone got three sixths of a banana.

​Our apple was quartered and our strawberries and grapes were halved. We did the cutting all together, and then we made sure we could name the fractional pieces we had made (based on how many pieces ONE whole was cut up into). Then we counted how many of those size pieces we had.

​Once all the cutting up was done, my lovely PSA and I went around with a bowl of chocolate for everyone to dip their fruit pieces into. The kids might or might not have to have named their fractional piece before being given access to the chocolate! 

It was quite a fun maths lesson, and I felt like it reinforced the idea of 'naming the pieces' (denominator) vs. 'counting how many pieces we have' (numerator) quite well.

​If kids really understand what the denominator tells you (and that is naming the fraction), it's much easier for them to understand later on why you don't add the denominators together when you are adding fractions.
Picture
The original plan was to use the recording sheet to the left. Unfortunately, I tried to photocopy it right before the bell rang, and the photocopier shut down (serves me right for being so last minute!). But if you'd like to try this activity, and would like a simple recording sheet to use with it, just click on the picture and you'll be able to download this sheet (if you use it, let me know how it goes!). Since I didn't have the recording sheets, I just gave each table a white board, and we wrote our fractions down on those, and it worked pretty well.

0 Comments

Exploring Fractions

5/6/2016

0 Comments

 
Picture
Here in Scotland, we have 4 more weeks of school left - and unwisely, I have just recently begun thinking about fractions with my P3 class. I think I will begin a bit earlier next year.

​Although we have already touched on fractions in a variety of contexts (most recently when we were working on telling time), I'm planning to begin our fractions unit with a great idea from Adventures in Guided Math. I'll be taking in lots of different items, some of which are complete (an unopened box of cereal, for example) and some of which are incomplete (a half eaten package of biscuits). And we'll sort them into items that are complete (1 whole) and items that are incomplete (fractional parts - although it might be a bit tricky to determine exactly what fraction of the whole each thing is).

Exploring this idea of 'whole' versus 'part of' something is important, and we'll link this to finding fractions (part of 1 whole thing) on a number line. I've been reading the book 'Beyond Pizzas and Pies', and that is one of the foundational concepts about fractions that kids often don't grasp - that a fraction is a number on a number line (albeit a number that falls between the whole numbers that we have focused on up to now).

So my full box of cereal is 1 box - we can place that at '1' on the number line. But my partially eaten packages of biscuits is less than 1 - I'm hopeful that will generate some good conversations about approximately where on a number line we might place a mark to indicate 'how much' of 1 package we have. We shall see (and I'll let you know how it goes).

​We'll then need to look at the idea of fractions as 'equal parts' of one whole. When we know 'how many equal parts' 1 whole is split into, that allows us to find where a given fraction falls on a number line. We can split our number line into the right number of equal parts (our denominator), then count how many parts we need to jump to get to the right one (the numerator).

Depending on how quickly we are comfortable working with these concepts, we'll eventually be moving on to using the 'fraction foods' pictured above (if you click on the link, it will take you to a post from 'Adventures in Guided Math', where you can download your own copy). I've blown these pictures up, and made 3 sets of them; hopefully this will give us some flexibility in how we use them (Having done a pre-topic assessment, I have a few maths whiz kids who are ready to start looking at mixed numbers, etc).

​I'll hopefully find the time to continue posting a bit about how we are exploring the concept of fractions - fingers crossed that my class can concentrate for long enough, despite the time of year and sunny weather, to take some of it in!  

0 Comments

More Mixed Operation Problem Solving

2/5/2016

0 Comments

 
Picture
I hope everyone is enjoying their bank holiday!

​We are continuing to practise our problem solving skills using all 4 operations in my class, so I've made another set of 'Write the Room' cards. I find that my class is just much more engaged in their problem solving when they can be up and moving around the room with a clipboard.

​These cards are a similar difficulty level to the last set I posted (and there are another 24 problems to be solved), so if your class (or just a group within your class) needs a bit more consolidation of their problem solving skills, you might be able to use these.

​When I cut these out to use them, I just guillotine the cards in a straight line - I don't cut around each circle in the frames!

0 Comments

Problem Solving around the Room

23/4/2016

0 Comments

 
Picture
Problem solving always seems to intimidate kids in my experience. Probably because just following procedures doesn't work - you have to read and think to get the right answer!

​But kids need to be able to figure out the right operation to use. And checking how well your class can problem solve gives you some indication of how deeply they understand the 4 operations. So we do a fair amount of problem solving in my class.

​To make it a bit more fun (and to cut down on my photocopying), we usually 'Write the Room' when we practise solving word problems. I make up sets of 24 cards which are numbered. I laminate, cut the cards out, and post them around the room. Kids then arm themselves with clipboards, pencils and either jotters or a recording sheet, and set off to find and solve as many problems as they can. There is something about being able to be out of their seats, walking around the room, that seems to help them focus on the word problems, rather than the conversation they'd like to have with the person sitting next to them! It also gives my class a chance to choose a partner to work with, if that's what they'd like to do.

​At the beginning of the year, we started off by solving problems with single operations (so all addition, then all subtraction, etc). This was good for getting them used to the procedure, but I'm not really a fan of single operation problem solving. I find that the kids don't really read the problem. They just find the 2 numbers and perform whichever operation we are work currently working on.

​So now that everyone knows what to do when we are 'Writing the Room', when I'm making up sets of cards, I mix up the operations. Because we've now done all 4 operations (and are currently working on division), our problem solving is either multiplication & division together, or all 4 operations mixed up.

​If you click on the above picture, it will take you to a file with mixed problem solving using all 4 operations. This is an early set, and almost all of the sums are within 30 (I think one card asks them to multiply 8 by 4, so your answer is 32).

​I generally only put 12 cards up at a time. When we do maths stations, kids have 20 minutes or so at each station, so 12 problems is about right (although they usually have to finish the 'Write the Room' problems before moving to the next station). I sometimes use the first 12 problems to practise problem solving with my small groups before sending them around the room to solve problems 13-24. Or at times, I send them around to solve problems 1-12, then I keep 13-24 in reserve to use the next day (if they need more practise). There are a couple of different recording sheets at the end of the file that you can use (when I use recording sheets, I photocopy them double sided). Or alternatively, you can just let the kids solve the problems in their normal maths jotters. That's what I tend to do, now that the kids have the hang of this particular task. I just emphasise that they MUST number the problems, so I know which problem they are solving when I come to mark them!

​I hope you find these useful. If you aren't keen to have kids up and moving around the room, these cards would also make a useful set of Task Cards for maths stations. I've also used them as a whole class activity. When I do this, the kids all have individual white boards, and they write their solution down. On a signal from me, they all show me their answers. This works pretty well, and can be a good way to assess who is and isn't ready to practise problem solving on their own.

0 Comments

Helping Kids Understand Non-Fiction Texts

6/2/2016

0 Comments

 
Picture
 Last term, I attended a Twilight session looking at teaching literacy at the second level. I'm P3 this year, but I have a group of kids who are beginning to move towards working with second level texts. As I'm coming from Primary 1, I thought a bit of training might come in handy!

​One of the ideas I got from this twilight course was using 'Task Mats', and I wrote about it earlier on this blog. I've been using them ever since, and they've been a great way to get kids working on a variety of different reading comprehension tasks throughout the week. I've finally got my last group to the stage where they are ready to start looking at a simplified version of task mats - all very exciting.

​Most of the kids are doing reasonably well with reading fiction texts. Having a story structure to hang their understanding of what they are reading on is so helpful.

​But when we come to non-fiction, story structure obviously isn't there. And as we moved into more challenging non-fiction texts, I was finding that my class was struggling to tell me what they'd read. I could ask them questions, and they could happily use an index or table of contents to find the answer. BUT - if you asked them what the book was about, or asked for a general overview of a page or two, they were lost. Not good.

​So we've been slowing down a LOT. Using the Reading Comprehension Animals I've blogged about, we've been focusing on 'Predicting Panda' and 'Wondering Walrus' as we look at how to understand and remember non-fiction.

​Before we read, we look at the title of our book and the blurb on the back. Then we predict: What do we think we are going to learn about in this book?

​On turning to the first chapter, we stop before we read. Using the title and the pictures this time, we predict again - what do we think we are going to learn about in this chapter? When reading non-fiction, I found that my kids wanted to skip the title, barely glance at the pictures, and completely ignore the picture captions - despite the fact that so much of the information in the text was contained in those elements. Their focus was on how fast they could read, rather than how well they could understand.

​But when we started to stop and predict before reading, this activated any prior knowledge the children had, as well as helping them to focus in on what they should be learning.

​After predicting 'what we will learn', we read the chapter. Once we have finished, we stop again (this has been the key, I think - getting them all to slow down!), and we ask ourselves (we 'wonder') - were my predictions right? Have a learned something else other than what I predicted? What have I learned?

​This procedure forces them to check that they've understood, and that they can offer some kind of summary of the information they've just read. It's been a slow process, but I'm beginning to see more understanding when I'm asking general questions during small group reading. They are also getting better at using the title and pictures to focus in on what each chapter is likely to be about, so their predictions are getting better.

​Along with small group reading, we've also been reading The Magic Tree House Viking non-fiction companion book as a whole class when we have a spare 10 minutes at different points throughout the day (we are studying the Vikings this term). We've again been using our 'predict, read, wonder/question' cycle to help us understand what our text is telling us about the Vikings. This has given me a good opportunity to model this comprehension cycle using a non-fiction topic the whole class is really enjoying (and has reasonable prior knowledge about).

​I've made the Task Mat above 'clickable', so you can download it to have a closer look if you want. Because I'm using the Reading Comprehension animals to teach the strategies, I have put a picture of the relevant animal on the task mats I'm using. The version I'm uploading doesn't have those pictures, however (the pictures are bought clipart, so I cannot upload them to the web in an unsecured form). By taking the pictures out, though, I've been able to leave the Task Mat as a Powerpoint file (rather than turning it into a PDF). That means that you will be able to edit it to make it suitable for the books your class are reading, if you'd like to give the Task Mat idea a try.

​If anyone has any ideas for helping kids understand non-fiction, I'd love to hear them. It's such a different reading skill than understanding a narrative text, and I know it can be quite tricky for a lot of our kiddos.

0 Comments

Multiplication Arrays and Lego

27/1/2016

0 Comments

 
Picture
The joys of Sunday when you are teacher...I spent about 30 minutes sorting through my son's old Lego, pulling out the flat pieces to use in class this week.

​What have we done with them? We are working on arrays. We've spent a couple of weeks focusing on picturing multiplication equations as 'groups of' the same size. At the end of last week, we started picturing multiplication equations as arrays.

​So on Saturday, I was having a look on Pinterest (don't we all?), to see what ideas I could find to reinforce this idea.
Picture
Pinterest led me to The Star Spangled Planner teacher's blog - particularly this post (it's well worth a look if you are currently teaching multiplication):

http://www.starrspangledplanner.com/2014/12/10-multiplication-center-ideas.html?m=1

​Among many great ideas, there was using Lego blocks to create and solve arrays. My class has really enjoyed this, and it has been the perfect self-differentiating activity. I have some kids who are struggling with the idea of 2 x 4, while at the same time I have a couple of kiddos who are quite happily multiplying double digit numbers (crazy for P3, right?). But these Lego arrays have been good - the kids are able to create easy or hard arrays and solve them - it's up to them.

​So here are the results of today's work in my 3 different groups:
Picture
This is my group who finds multiplication the trickiest. Most went for the very straightforward bricks, although I did have a couple of 2 x 17 type problems (and I know which kiddo needs to remember to put in an equal sign instead of another multiplication symbol). You can see one bigger green square block - it was 8 x 8. We came close, but needed a bit of support to figure it out. But I loved the fact that this kid was able (and wanted) to challenge himself this way.
Picture
 This group was a bit more adventurous, although you can definitely see a few wrong answers in there! But they were challenging themselves, which is great to see. I helped one person figure out 16 x 8, and several others then jumped on that particular bandwagon.
Picture
This last picture is from my kiddos who are largely getting the hang of multiplication quite well. Most of this group was out with SfL for a 'challenge' maths session, so they only had a few minutes right at the end to come up with these equations. These pictures show the challenge of teaching, don't they? A huge spread of understanding between the different groups.

​By the last group, I realised I needed to get them to use black markers, so I could easily read their equations in my pictures. Tomorrow, this will be an independent station, so I've prepared a simple sheet for them to paste into their jotters, so they can write down (and be held accountable for!) the Lego equations they solve. If you'd like to use this idea, click on the picture below to get your own Lego equations sheet (I've copied it in greyscale, rather than colour).
Picture
0 Comments

The DoublesĀ  Strategy for Multiplication

5/1/2016

0 Comments

 
Picture
I hope everyone has had a restful Christmas break. I took my own advice and had a lovely time off with family, but now that means the last couple of days have been hectic! Luckily, here in Aberdeenshire we didn't have the September long weekend, and those extra 2 days were added to our Christmas holiday, so we go back to school tomorrow.

​In maths, we'll be starting to look at multiplication and division. I'll have my class do a pre-assessment tomorrow, to find out exactly what they do and don't know. However, I'm pretty sure I'll find a range of different levels of understanding of multiplication (I know that at least a couple of kids already know all of their times tables to 10), so I've made a set of differentiated game boards for us to start off with this week.

​Kids seem to pick up doubles fairly easily - most of my class know their doubles to 20, and many can double beyond 20 relatively easily (we work on this skill each morning as part of our morning administration routine - we double the number of children having school dinners each day). The doubles strategy in multiplication builds on the doubling skills that the kids already have. The 4 times table just doubles the answers in the 2 times table (and 8 doubles 4, 16 doubles 8, etc).

​The games I've made start at an easy level (the one shown above), to help support my kiddos who find maths a bit trickier. There is also a game board using the 2, 4 and 8 tables, as well as a challenge board using the 4, 8 and 16 tables. Each board has its own small 'multiplication grid' answer card, so kids can check their answers as they go (and they aren't practising the wrong sums!).

​You can click on the picture above or here to download your copy of these games.

​The game is played very easily. Each player takes a turn rolling the die. They then move their counter that many spaces. If they have rolled a '3' and land on the '4', they multiply those 2 numbers together. If they answer '12' correctly, they remain on that space. If they answer incorrectly, they go back to their previous space (you can obviously modify this rule, if you want - so children could go back 1 space, etc for a wrong answer). I find that it helps to have a small penalty for a wrong answer - that is usually enough incentive for the playing partners to not let each other cheat, by looking at the answer grid before answering their question!

​I'll be using this game in conjunction with doing number talks that focus on this doubling strategy. So I'll also be modelling for the kids how to use mathematical language to explain how they got each answer (e.g., 'I know that 3 x 2 = 6, so I know that 3 x 4 is double 6, or 12').

​Hope your first week back goes well. If you are starting to look at multiplication as well, and are able to use this game, I'd love to hear from you about any modifications you make or how your kids like it.


0 Comments
<<Previous

    Categories

    All
    100 Days Of School
    2 Times Table
    Adding And Subtracting
    Adding Strategies
    Addition
    AI And AY Sounds
    Ai Phoneme Game
    Alphabet
    Art
    A Teachable Teacher
    AW Words
    Back To School
    Ball Words
    Base 10 Materials
    Book Bands
    Book Levelling
    Books
    Christmas
    CK Wall Words
    Class Library
    Class Maths Area
    Classroom Organisation
    Colouring
    Compound Words
    Computation Strategies
    Counting On And Back
    Counting On Fingers
    CVCe Words
    Decoding Strategies
    Differentiated Kindergarten
    Digraphs
    Dipthongs
    Dolch Words
    Dot Cards
    EW Words
    Fast Finisher Tasks
    First Week Of School
    Fist Numbers
    Flashcards
    Fractions
    Freebies!
    Free Play
    General
    Homework
    IGH Words
    Independence
    Initial Blends
    John Mighton
    Jolly Phonics
    JUMP Math
    Kindergarten
    Kinesthetic Learners
    Literacy
    Literacy Games
    Literacy Resources
    Long A Sounds
    Magic E
    Maths Journals
    Maths Resources
    Maths Stations
    Mental Maths
    Messy Play
    Mixed Operations
    MMT On Facebook
    Morning Routine
    Multiplication
    Myth Of Ability
    North Lanarkshire Active Literacy
    North Lanarkshire Active Literacy Resources
    North Lanarkshire Active Literacy Stage 2
    North Lanarkshire Active Literacy Stage 3
    Number Formation
    Number Of The Day
    Number Sense
    Numbers To 10
    Numeracy
    OU Words
    OW (long O) Words
    Phoneme Resources
    Phonemes
    Place Value
    Playdough
    Primary 1
    Primary 2
    Primary 3
    Problem Solving
    Reading
    Reading Comprehension Strategies
    Reading Comprehension Strategy - Retelling
    Rights Respecting School
    Sight Words
    Spelling
    Stage 1 Phonemes
    Stage 2 North Lanarkshire Active Literacy
    Stage 2 Phonemes
    Stage 3 Phonemes
    Story Maps
    Subitizing
    Subtraction
    Summer Holidays
    Task Cards
    Teachers Pay Teachers
    Ten Frames
    The Kapok Tree
    UN Convention On The Rights Of The Child
    Wall Words
    Word Wall
    Write The Room
    Y (long E) Words

    About Me

    I have taught from P1-P5 (K-4th grade). You'll find a variety of resources and ideas appropriate for these year groups as you explore this blog. I'm glad you are here and I hope you find activities, ideas or resources that are useful in your own class. 

    RSS Feed

    Archives

    July 2020
    October 2019
    September 2019
    August 2019
    December 2018
    August 2017
    October 2016
    July 2016
    June 2016
    May 2016
    April 2016
    February 2016
    January 2016
    November 2015
    October 2015
    September 2015
    August 2015
    July 2015
    June 2015

 2020 Monday Morning Teacher